
FRZ Scalping Ultimo – User Manual
- Related Product: FRZ Scalping Ultimo
- Browse Similar Tools: Forex Trading Robots
| Product name | FRZ Scalping Ultimo |
| Platforms Supported | MT4/MT5 |
| Time frames supported | M5 |
| Recommended currency pairs | Any pair that includes EUR, USD, GBP, JPY, CAD, AUD, CHF, NZD. Please use the EA on at least 10+ pairs. EA will not take trades on all pairs at once. |
| Recommended min. deposit | Minimum $500 ($1000 recommended). Cent accounts can also be used. |
| Recommended lot sizing | 0.01 lot size for each $1000 of deposit per pair (conservative) 0.01 lot size for each $500 of deposit per pair (Standard mode) |
| Backtesting | Back-testing is possible on the full version but possible on the DEMO version. |
NB: This is an aggressive trading robot. There can be extended drawdown periods if the market goes against us. Always withdraw profits whenever you reach 25%of the deposit. Use an equity-based stop loss based on your risk appetite (A minimum 25% equity stop loss is recommended). We recommend that you withdraw the profit whenever the balance reaches 25% return on capital invested at least until you fully recover your initial deposit.
How to Install
1. Go to MetaTrader>Options>Expert Advisors and tick “Allow automated trading”.
2. Allow the following URLs under MetaTrader options:
https://faireconomy.media
https://frzserver.com
3. Copy and EA to the MT4/5 Expert folder.
4. Restart/refresh your MT4/5.
5. Load the EA to any recommended charts on M5.
4. If your broker’s pair names have any prefix or suffix add them under relevant setting.
5. Change the lot size and other settings as necessary.
6. Add more charts if necessary with the same settings.
EA Settings
Settings Explanations
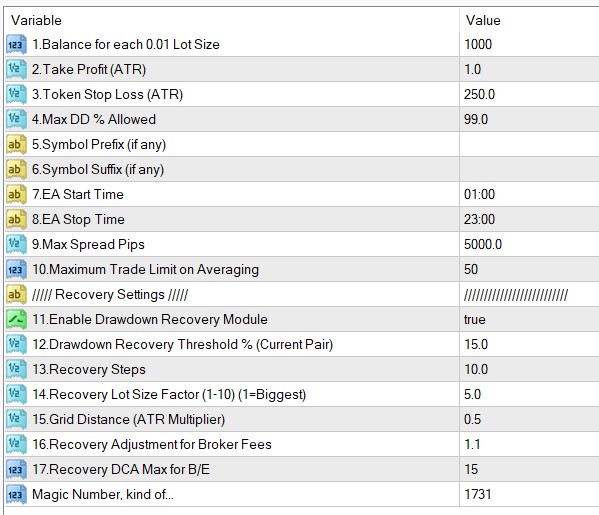
1. Lot Size => Here you can set the lot size.
- 0.01 lot size for each $1000 deposit per pair (recommended)
- 0.01 lot size for each $500 deposit per pair (Standard mode)
Examples:
If you put 500 here and your deposit balance is 1000, then the lot size would be = 1000/500*0.01= 0.02 lots
If you put 250 here and your deposit balance is 2000, then the lot size would be = 2000/250*0.01= 0.08 lots
2. Take Profit (ATR Multiplier) => You can set the TP as an ATR multiplier (Not in pips). For instance, if the ATR is 10 pips and if you put 2 here, your actual TP would be 20 pips. We recommended you use the default setting. Do not make it too large as this is basically a scalping strategy.
2.Token Stop Loss (ATR Multiplier) => You can set the SL as an ATR multiplier (Not in pips). We recommend you have a large hard stop loss which we do not expect to hit. This large stop loss level is simply to make sure the entries have some stop loss as some brokers would require some stop loss. This stop loss would largely serve as a formality. Our effective stop loss should be the drawdown based stop loss discussed in a later setting.
4. Max DD% Allowed => This is the equity-based stop-loss; we recommended you have some stop-loss here. For instance, if you add 25 here, EA will stop new trades once the drawdown reaches 25%. However if you use the drawdown recovery module, we recommend you allow a much higher drawdown level as recovery process may increase the drawdown temporarily.
5. Symbol Name Prefix: If our prop firm’s currency pair names include a prefix, you need to add it here. If your prop firm’s pair names have no such prefix, you can simply keep this setting blank.
Example prefixes deBTCUSD, dmBTCUSD, m.BTCUSD => In these cases de, dm, m. should be added under this setting.
6. Symbol Name Suffix: If our prop firm’s currency pair names include a suffix, you need to add it here. If your prop firm’s pair names have no such suffix, you can simply keep this setting blank.
Example suffixes: BTCUSD.cc, BTCUSDcash, BTCUSDm => In these cases .cc, cash, m should be added here.
If your pair name has both prefixes and suffixes, you need to add them both under settings.
7 & 8. EA Start and Stop time => You can adjust the time of operation here. The time is the time used by your broker on the MetaTrader.
9. Max Spread => Here you can set the maximum spread in pips you can allow. If the spread is more than this amount, the robot will not take trades.
Drawdown Recovery Module
The EA comes with a drawdown recovery module that can be automatically activated when a certain threshold of drawdown occurs. However, you should only activate this module if your broker allows internal hedging (i.e. having both buy and sell trades for the same pair at the same time).
NB: There is no guarantee that this module can recover drawdowns all the time. If the price changes again on a long term trend, then you may even reach the daily drawdown limits faster.
11.Enable Drawdown Recovery Module: Here you can enable or disable the module.
12.Drawdown Recovery Threshold % (Current Pair):
This is the drawdown level that activates the recovery module (use it without “%” sign). Please note this considers only the current symbol drawdown (to which the EA is attached) not the overall account drawdown. This is calculated as follows: Current loss from the current pair/Account balance x 100%.
In other words, EA works for the symbol/pair it is attached. Thus, symbol drawdown could be lower than the account drawdown.
Although you can use this with any drawdown, we recommend to have this value to be as less as possible. We recommend you have this between 15-20%. This is because the drawdown recovery module will also use DCA trading and will need some drawdown space to operate.
13.Recovery Steps
EA tries to recover the loss piecemeal. For instance, if you have a drawdown of USD 1000, EA will try to recover the total loss part by part and close the original trades and the hedge trade once the hedge loss is fully recovered. You can adjust the no of parts with this setting. For instance if you use 10 here, EA would try to recover the drawdown in 10 parts.
14. Recovery Lot Size Factor (1-10) (1=Biggest)
You can have 1 to 10 here. This setting will affect the lot sizes of the recovery trades (1 = higher lot size while 10=lower lot size).
15.Grid Distance (ATR Multiplier)
This is the minimum price gap between two DCA trades of the recovery module. lower this number, you will get more DCA trades.
16.Recovery Adjustment for Broker Fees.
Here you can adjust the recovery amount for any potential broker fees other than swaps. Usually trading commissions, slippage, spreads, etc. can impact the total amount recovered and then the total amount recovered can be less than the actual drawdown amount. This setting can be used to minimize this difference. For instance, if you want to increase the amount to be recovered by 1%, then you need to set this as 1.01. If you want to increase it by 5%, then set this as 1.05.
17.Recovery DCA Max for B/E
If the no of recovery trades goes over this number, then the EA will try to close the those recovery trades at breakeven without waiting for the recovery step amount in order to minimize the risk. Please note this does NOT limit the no of recovery trades.