Setting 1: Indicator Name
You need to add your indicator name here. This is the main signal indicator for buy and sell signals.
You need to have the indicator name exactly as per indicator file name (no need to have the ex4 file extension). Further, if your indicator is NOT directly within the MT4 indicators folder (i.e. if it is in a subfolder within the main MT4 Indicators folder), you need to add the indicator name along with the folder path. For instance, if your indicator name is “Candle Stick Reversal Indicator” and the indicator is located in the “Market” sub-folder within the main MT4 Indicators folder then you need to enter the indicator name as follows:
Market/Candle Stick Reversal Indicator
NB: Entering indicator name is not necessary for object-based indicators because EA is simply reading the objects on the chart created by the indicator.
Setting 2-5: Select the type of the indicator you want to use
As explained before, there are 4 types of indicators that can be automated with our EA. The First 3 types use indicator color IDs or buffer numbers while the 4th type is based on indicator created objects. You need to enable the right type. Please make sure only one type is enabled and the other three are disabled.
Setting 6-7: Color IDs (Buffer Nos) for Buy & Sell (applicable for Indicator Type 1 to 3)
You need to identify the correct color IDs for the buy and sell signals respectively.
NB: these settings are not applicable for object-based indicators as we are not using color IDs for such indicators).
Setting 8: Candle ID (Applicable for Type 1-3 Indicators only)
This is the candle ID that the EA looks for possible signals. “0” means the current forming candle and “1” means the previously completed candle and so on. For instance, if you have “1” here, the EA will always look at the immediately completed candle for any buy or sell signals. Most indicators tend to repaint within the current candle and therefore you need to be careful in using “0” here. If your indicator is heavily repainting, then you may consider increasing the candle ID. However, on the other hand, this may lead to delayed trade entries.
Setting 9: Timeframe in Minutes (0=Current, 5=5 Mins Chart & So On)
You can use the indicator on any timeframe. Timeframe is selected by no of minutes. 0 means the current timeframe you are running the Automater. For instance 5 means 5 minute chart, 15 means 15 minute chart, 30 means 30 minute chart and so on. Please note the Automater will be running your indicator on the timeframe you specify from background.
NB: On MT4, you cannot do backtesting on multi timeframes (this is a technical limitation on MT4). So if you are backtesting on MT4, then you can only use 0 or the current timeframe. But you can use any timeframe when using on demo or real accounts on live market on MT4. However, MT5 supports multi timeframe backtesting.
Setting 10-20: Applicable for Object based Indicators
Note: Before customizing these settings, you need to have selected the object based indicator type under Setting 5.
A chart can have many objects on it. But the EA needs to distinguish the buy and sell signal objects from other objects to avoid conflicts.
This is done through either
- an object name prefix + respective buy & sell colors or
- distinguishable text for buy and sell objects.
Using a common object name prefix with different object colors for buy and sell
Setting 10: Object Name Prefix: In this method, the indicator objects need to have a predefined prefix for identification. This prefix can be one or a few initial characters which are present in every buy/sell object that the indicator makes.
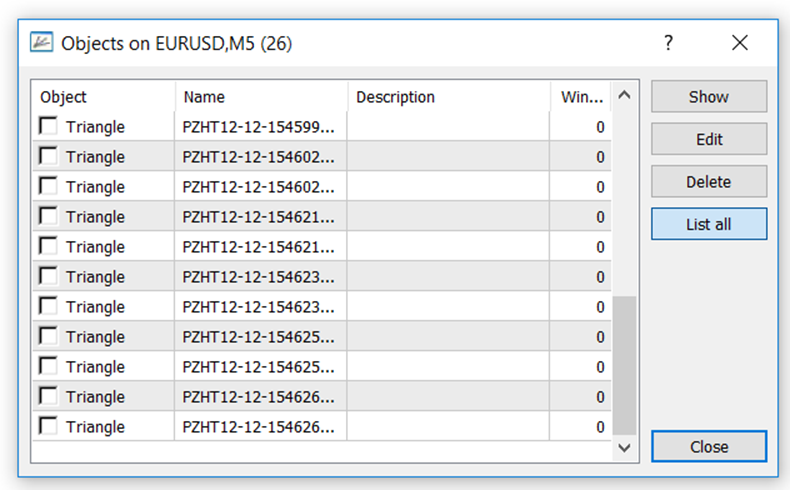
Example: The below is from an indicator that creates blue and red triangles as sell and buy signals respectively. If you look at the objects created by this indicator as given below, you will notice that all the objects have the prefix “PZHT12”, so this part can be used under this setting. The idea here is to distinguish the buy and sell objects from other objects so that the EA can use them for trading.

Now we have identified the buy and sell signal objects with a common prefix. The next step is to distinguish between buy and sell which is done by the respective object colors.
Setting 11: Object Color for Buy Objects: You need to select the right color of the buy signal object. No other indicator must be generating objects with this color with the same name prefix to avoid confusion. You may change the colors to have unique colors for the selected buy signal if your indicator has customizable colors.
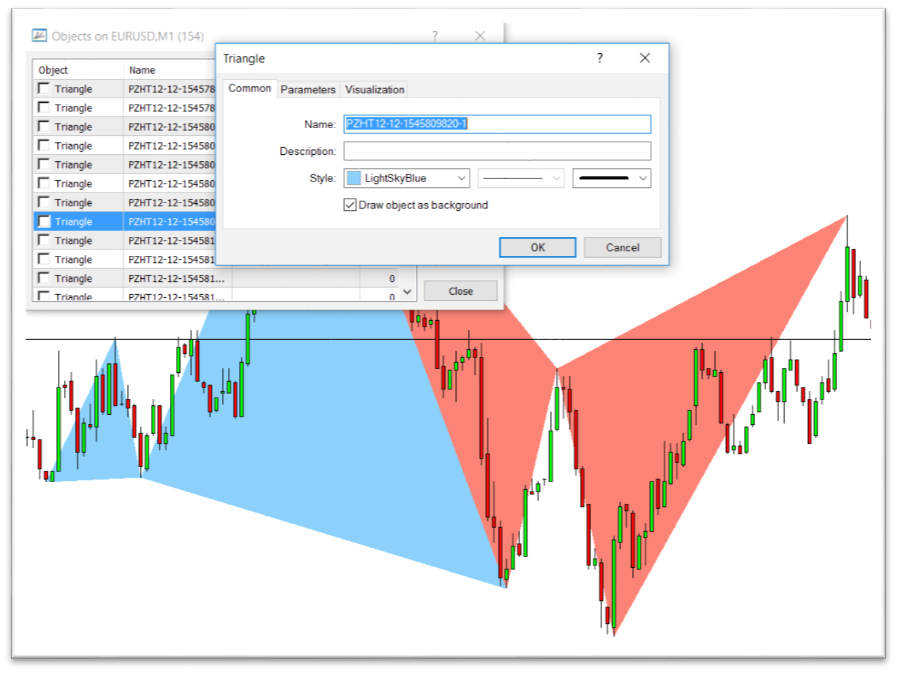
You can find the objects colors by: right click on an MT4 chart area, click on “Objects List”, and select the required Object. The color can be found in the “Style” setting under the “Common” tab of the object properties.
Setting 12: Object Color for Sell Objects: This is the opposite of the previous setting. Set the correct color of the sell signal object.
Example: given below are the objects from a Harmonic pattern indicator, which creates triangle objects on the chart on the finding of harmonic patterns. You need to select the “LightSkyBlue” color under the buy signal with this object.

Using a common object name prefix with different object colors for buy and sell
In this method, your objects need to have distinguishable text/number for buy and sell signals. This can be a prefix, suffix or text/number in the middle.
Example 1: An indicator creates objects whose name can be xxxxB123xxx for buy objects and xxxxxS123xxx for sell signals. Here you notice that B123 and S123 can be used to distinguish buy and sell objects.
Example 2: An indicator creates objects whose name can be xxxxx0-01 for buy objects and xxxxx0-02 for sell signals. Here you notice that 0-01 and 0-02 can be used to distinguish buy and sell objects.
Example 3: An indicator creates objects whose name can be trend1xxxxx for buy objects and trend2xxxxx for sell signals. Here you notice that trend1 and trend2 can be used to distinguish buy and sell objects.
Setting 13: Object Name Includes for Buy: This is where you add the buy signal common text as discussed above.
Setting 14: Object Name Includes for Sell: This is where you add the sell signal common text as discussed above.
Once we identify the objects for buy and sell signals we can further use time filters to identify the most recent and tradeable objects.
Setting 15: Filter by Time: When you first load the EA on to the chart, the chart may load objects created based on the past candles. However, EA needs to ignore the past indicator objects and not open trades on past objects. You can set a period so that only the objects created within a specified period to the past from the current time can be used to make trades. This time will be with reference to the time of the object. However, an object can have up to 3-time points.
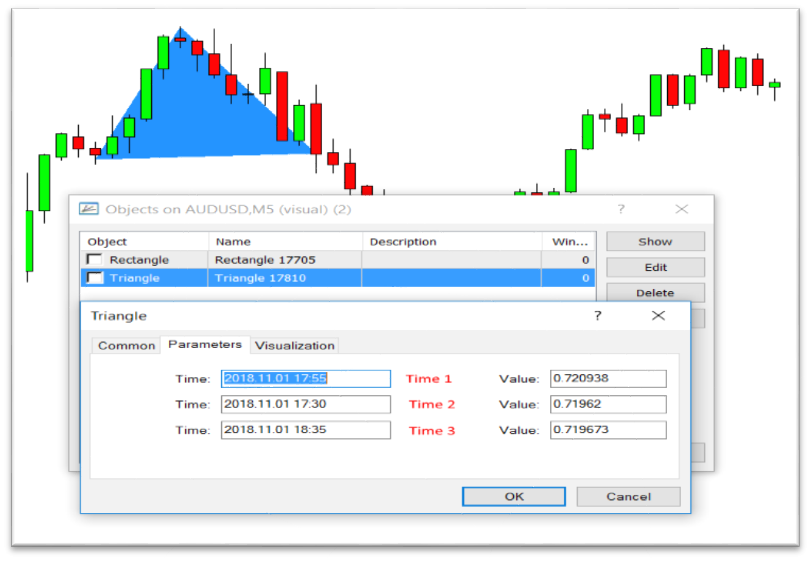
For instance, a triangle would have 03-time points and a rectangle would have 02-time points while an arrow would have only one time point. You need to decide which time point that you are going to use to filter the objects by time. Generally, if there are more than one time points for your object, then you need to use the latest time point.
You can find the objects by right-clicking on the MT4 chart area, click on “Objects List”, and select the required Object. The time points can be found under the “Parameters” tab of the object properties.
Example: Time points in a triangle object.

You should have only one time point as “true” out of the three and the other two should be “false”. The one you set as true will be the reference time for filtering past objects.
Setting 16: Explained above
Setting 17: Explained above
Setting 18: Object Newer than (Minutes): This is the time filter discussed before. The time is in minutes. For instance, if you use “5” here, that means objects created within the last 5 minutes with reference to the object time will be considered by the EA for entering into trades. Generally, it is recommended to use twice the time of your timeframe. For instance, if you are using the EA on a 5-minute chart, then it is better to have 10 minutes here. However if your objects are created later than that, you may have to increase this time.
Setting 19: Object Older Than (Minutes): This is the opposite of the previous setting. Sometimes, objects can be repainting and you may want to wait for little time before trade entry to see if the object disappears. For instance, if you put 10 minutes here, EA will wait 10 minutes after recognizing the object. If you want to enter the trade just as it is recognized, then leave this as “0”.
NB: “Object Older Than” time should always be less than the “Object Newer Than” time. For instance if you add 30 minutes for Setting 17, then you can have 29 minutes or less for this setting.
Setting 20: Same object updated: Some indicators do not generate new objects every time a signal is given. Instead, they only update the existing object. In this case, if you look at the objects, you will see that there are only two objects for buy and sell which are updated as and when new signals are generated. In such a case, you need to set this setting as “true”.
Setting 21-38: General Trading Settings
Following general trading settings are applicable for all types of indicators:
Setting 21: Lot Size: This is the lot size for the trades or pending orders. This is active by default.
Setting 22: Enable Lot Size as % of Account Balance: Instead of setting the lot size as a fixed amount you can optionally set the lot size as a percentage of the account balance based on the stop loss. If you enable this, fixed lot size you set in the previous setting will not be used.
Setting 23: % of Balance per Trade: This is where you set the % of balance mentioned in the previous setting. Do not use the % sign. Simply enter only the figure.
Setting 24: Stop Loss (Pips): Stop loss setting for trades. You can make it zero if you want to close the trade only on the opposite signal.
Setting 25: Take Profit (Pips): You can set the take profit here. You can make it zero if you want to close the trade only on the opposite signal.
Setting 26: Enable ATR based SL/TP: You can enable this feature here. If you enable here, then stop loss and take profit set in pips previously will be ignored. Instead of fixed stop loss and take profit, you can use ATR distance (14-period Average True Range) to dynamically set the stop loss and take profit.
NB: When you use any setting that would create more than one trade at any given time. The Automater will use the ATR that was used in the initial trade for the other trades created after the initial trades.
Setting 27: Stop Loss – ATR Multiplier: This is the ATR based stop loss that you can set as necessary. It has to be set as an ATR multiplier. For instance, if you put 2 here, then the stop loss will be two times the ATR distance at the time of entering the trade; if the ATR was 10 pips at that time, then the stop loss would be 20 pips.
Setting 28: Take Profit – ATR Multiplier: This is the ATR based take profit that you can set as necessary. It has to be set as an ATR multiplier. For instance, if you put 2 here, then the take profit will be two times the ATR distance at the time of entering the trade; if the ATR was 10 pips at that time, then the take profit would be 20 pips.
Setting 29: Enable Break Even Point: Here you can enable breakeven point. Please note breakeven point does not work when price optimization module is enabled (set both entry optimization by SL and by indicator signals as false).
Setting 30: Breakeven Point as % of TP: Here you can set the breakeven point distance. It needs to be entered as a percentage (without % mark) of the take profit (not in pips).
Setting 31: Trailing Stop (Pips): You can optionally set a trailing stop in pips (set as “0” to switch off trailing stop). Please note trailing stop does not work when price optimization module is enabled (set both entry optimization by SL and by indicator signals as false).
Setting 32: Trailing Step (Pips): Trailing step in pips for above trailing stop.
Setting 33: Slippage Filter (Pips): Slippage filter for trading. If slippage is more than this, the trade/order will not be executed.
Setting 34: Spread Filter (Pips): Spread filter for trading. If the spread is more than this, the trade/order will not be made.
Setting 35: Disable Auto Close on Opposite Signal: By default, the EA will close the existing trade when an opposite signal is received. With this option, you can disable this. In that case, the trade will be closed only by TP/SL or Trailing Stop.
NB: You need to have entry price optimizations disabled in order for this feature to work as the two features are in conflict with each other).
Setting 36: Allow Opening More than One Trade: By default, the EA will not open multiple trades/orders in the same direction. For instance, when there is a buy trade currently going on and the indicator gives another buy signal, the EA will not open another buy trade but it will simply keep the existing buy order. However, if you set this setting as “true”, then the EA will open more than one trade or order in the same direction. (Also note that if you disable auto close on opposite signals from above setting as “true”, then there can be more than one trade in both directions as EA will not close the trade on opposite signal).
NB: You need to have entry price optimizations disabled in order for this feature to work as the two features are in conflict with each other). Further, do not use this option with line indicators which may cause trades being created on every bar/tick.
Setting 37: Allow Simultaneous Buy and Sell: The previous setting enabled more than one trade at any given time but only in the initial direction. But if you like to have trades on both sides (both buys and sells at the same time), you need to enable this setting. NB: In other words, this will enable hedging (having trades both ways at the same time), please make sure your broker allows hedging.
Setting 38: Close Trades after Specified Minutes (0=Disable): You can auto close trade after a specified time period in minutes. For instance, if you want to close the open trades after 60 minutes, you can add 60 here. (0 means this is disabled). Please note this does not apply to pending orders.
