You can use pending orders instead of market orders. By default, the EA will make buy stops and sell stops. If you want to use limit orders instead of stop orders, please use the pip distance in minus. For instance, if you use -10 under “Pending Order Distance”, then the EA will make stop orders instead of limit orders.
Setting 39: Use Pending Orders instead of Market Orders: You can set this as “true” if you want to place pending orders instead of trades/market orders.
Setting 40: Pending Order Expiration Time (Minutes): Expiration time for pending orders (in minutes) if pending orders were selected. (Set as “0” to switch off).
Setting 41: Pending Order Distance (Pips): Distance for Pending Orders in Pips.
Setting 42: Pending Order Distance (ATR Multiplier) if ATR Based SL/TP Used: If you use ATR based stop loss and take profit, then pending order distance will also be as an ATR multiplier and the previous pending order in pips setting will be ignored by the EA. For instance, if you put 2 here, then the pending order distance will be two times the ATR distance; if the ATR was 10 pips at that time, then the pending order distance would be 20 pips.
Setting 43: Enable OCO Pending Orders: This will be effective only if you have enabled pending orders instead of market orders. If you enable this, EA will place two buy and sell pending orders from above and below from the current price at the distance/expiry specified under other pending order settings. Also, the two orders will be One-Cancel-Other (OCO). That means if one order gets activated, then the other pending order will be deleted. This can be useful if you would like to trade where your indicator signal does not work and the price goes the other way.
Setting 44-48: Partial Close Settings
You can set the EA to close a trade partially before it hits the TP along with several other options as given below. Please note partial close works only when entry price optimization (averaging) module is disabled (set both entry optimization by SL and by indicator signals as false).
Setting 44: Enable Partial Take Profit: Here you can enable or disable the partial close feature.
Setting 45: Partial Close %: This is the % closed from the current trade’s lot size. For instance, if the lot size of the on-going trade is 1 lot and partial close % is 10%, then Automater will close 0.1 and let the other 0.9 lot to run.
Setting 46: TP % to Reach for Partial Close: This defines the price point where partial close is executed. It is calculated as a % of the TP. For instance, say your TP is 100 pips and then you set this to 60%, then the partial close will be executed when you reach 60 pips in profits.
Setting 47: Move SL to Breakeven after Partial Close: If you enable this, SL will be moved to breakeven after the partial close. This would make sure you would not be losing after the partial close.
Setting 48: Remove TP after SL Moved to Breakeven: Optionally, you may remove the TP after the partial close. In this case, there will be no TP. If you use this option, we recommend you set a trailing stop under Setting 30. Otherwise, there will be no TP for the remaining portion of the trade. This may enable you to be in the trade as long as the price goes in your way.
Setting 49-60: Martingale, Operating Times & News Filter
Setting 49-50: Martingale Options
This EA facilitates martingale. That means you can increase the lot size for the next trade whenever you lose a trade.
NB: Martingale can be risky and it can blow your account quickly if you face a series of losing trades. Therefore, you need to be cautious when using martingale.
Setting 49: Martingale Multiplier on Losing Trades: By default, this setting is set to 1. This causes the option value to be multiplied by just 1 and that means there is no martingale and the lot size is fixed by default. If you want to use martingale, you can increase this number as required. For instance, if you use 2 in this setting, then the lot size will be doubled every time you lose a trade. And the option value will be reset to initial value when you end up winning a trade.
Setting 50: Martingale Volume Maximum: This is the maximum volume the EA would trade if the martingale option is used. This will work as an upper limit for the martingale option. Use “0” here if you do not want to use an upper limit.
Setting 51-55 – Operating Time Filters
There are two time filters you can set. Second time filter is optional and can be enabled/disabled. For instance, if you want the EA to work only during two particular forex sessions, you can easily set those two sessions start and end time so that the EA will work only during those times. Please note the time here is the broker time (in other words, your MT4 chart time).
Setting 56-60 – News Filter Settings
NB: These news filter settings take effect when you change them at the load of the EA only. News filter will not work under strategy tester.
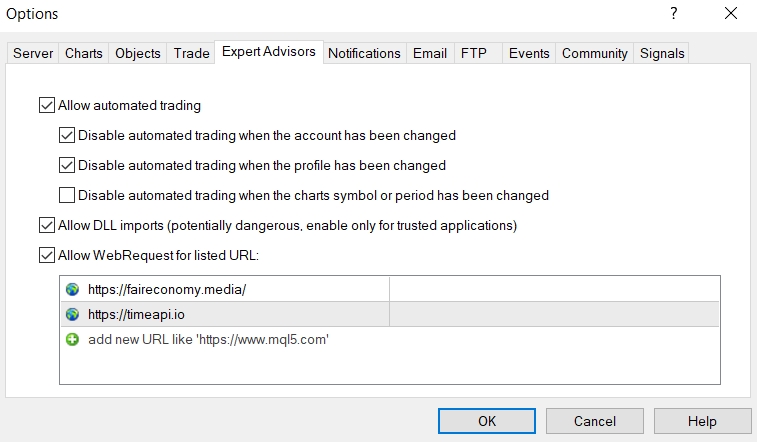
These are the news filter settings. You can select which news you need to enable out of low-impact, medium impact, and high impact news. Then you can select the EA pausing time before and after the news in minutes. EA will pause trading during the set time period before and after the news. Go to MT4 => Options=>Expert Advisers and allow automated trading, DLL imports, and Web Requests and add following URLs to allowed URLs.
- https://faireconomy.media
- https://timeapi.io
NB: The news filter will not work without these allowed URLS. Given below is a screenshot of what you need to do.

Setting 61-66: Signal filtering by a Second Indicator
The EA facilitates the signal generated by your main indicator to be filtered by a second indicator (only buffer/color ID-based indicators can be used as the second indicator).
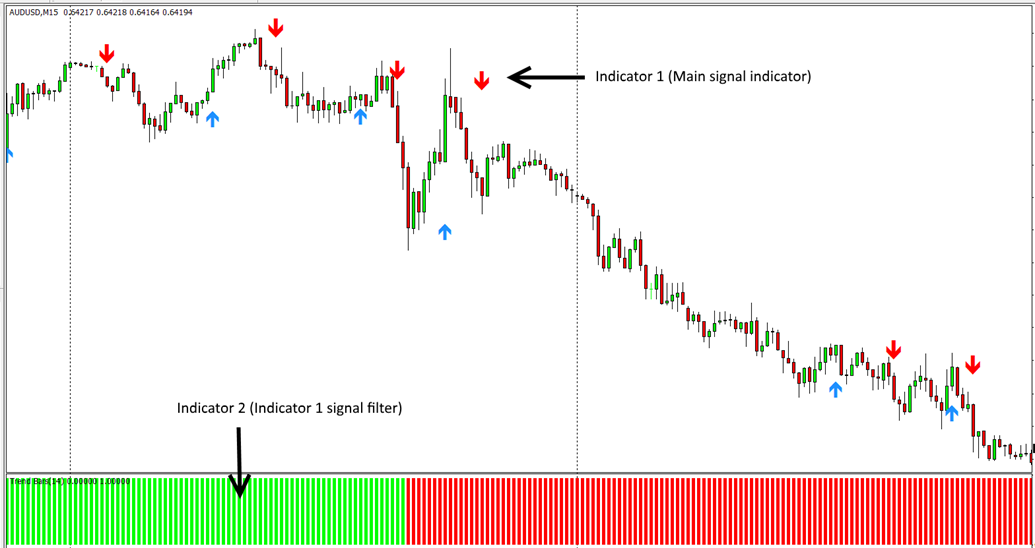
Please look at the below screenshot to understand this feature. Indicator 1 is your main indicator that generates buy or sell signals. And the second indicator (Trend Bars Indicator) is an indicator that shows the overall trend of the market. If you want to consider the buy and sell signals only when the overall market trend agrees with the signal (or even the opposite happens), you can use this feature to achieve that objective.
NB: You can use any suitable indicator as the second filtering indicator, preferably one that provides continuous signals that is always present; thus an arrow based indicator may not be suitable for this. Also, note that the EA will only consider the default settings of your second indicator too. If you need to change settings you will have to change the default settings in source file [.mq4] and then generate the ex4 file. But we can add inputs of your indicator to the EA at an agreed additional fee. We can do it even if you have only an ex4 file.

Setting 61: Enable Signal Filtering by a 2nd Indicator: This is where you enable the signal filtering by a second indicator. Please note you can only use buffer/color ID-based indicators for this purpose as mentioned before.
Setting 62: Second Indicator Name: You need to type the second indicator name exactly as per the indicator file name (no need to have the ex4 file extension). Further, if your indicator is NOT directly within the MT4 indicators folder (i.e. it is in a subfolder within the Indicators folder), you need to add the indicator name with the folder path. For instance, if your indicator name is “Candle Stick Reversal Indicator” and the indicator is located in the “Market” sub-folder within the main MT4 Indicators folder then you need to enter the indicator name as follows: Market/Candle Stick Reversal Indicator.
Setting 63: Buy only if this Color ID/buffer No is present on 2nd Indicator: This is the buffer number to see if it’s present in the candle ID set under the setting 62 for buy trades. (In other words, this is the Color ID of the second indicator to be used as a filter for the first indicator’s signals for buy trades).
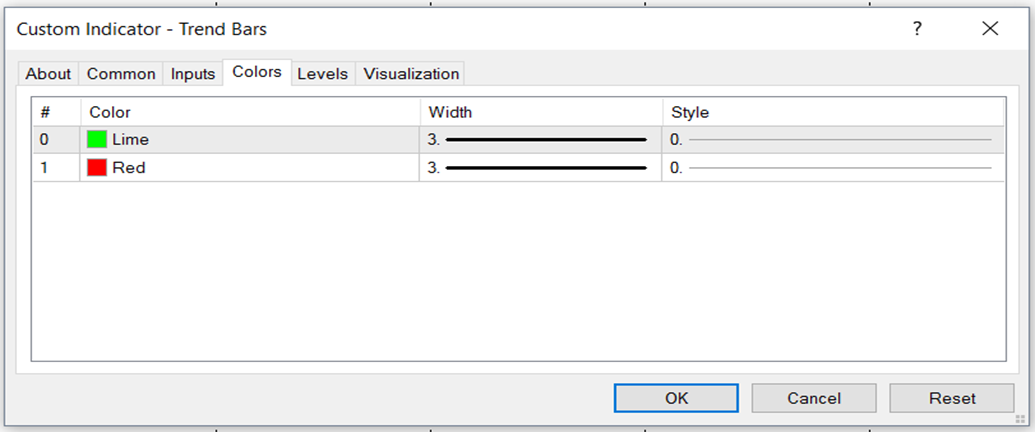
Let’s check out the below screenshot for an example for a second indicator. This is the buffer setting screenshot for previously mentioned Trend Bars Indicator.

Here the bullish trend is shown by Color ID “0” while the bearish trend is shown by Color ID “1”. So if you want to enter buy trades on your first indicator only when the market is in an overall bullish trend indicated by the second indicator, you need to have “0” under this setting. (Also note that if you need, you can use “1” as well. In that case, you will be entering buy trades when the market is in an overall bearish trend).
Setting 64: Sell only if this Color ID/buffer No is present on 2nd Indicator: This is the buffer number to see if it’s present in the candle ID set under the setting 62 for sell trades. (In other words, this is the Color ID of the second indicator to be used as a filter for the first indicator’s signals for sell trades).
Setting 65: Candle ID to Check on 2nd Indicator: This is the candle ID to look at in the second indicator to see if the filtering Color ID is present. It can be anything from “0” onwards. “0” means the current forming candle and “1” means the immediately completed candle and so on. Please note that the current candle can be repainting in most indicators and be careful in using “0” here.
Setting 66: Timeframe to Check for 2nd Indicator (0=Current, 5=5 Mins Chart & So On)
You can use the second indicator on any timeframe. Timeframe is selected by no of minutes. 0 means the current timeframe you are running the Automater. For instance 5 means 5 minute chart, 15 means 15 minute chart, 30 means 30 minute chart and so on. Please note the Automater will be running your indicator on the timeframe you specify from background.
NB: On MT4, you cannot do backtesting on multi timeframes (this is a technical limitation on MT4). So if you are backtesting on MT4, then you can only use 0 or the current timeframe. But you can use any timeframe when using on demo or real accounts on live market on MT4. However, MT5 supports multi timeframe backtesting.
Setting 67-76: Signal Filtering by a Third Indicator
Optionally, you can further filter your first indicator signals by a third indicator. Unlike the second indicator that uses buffer color ID, this third indicator filter uses the values of the buffer/color IDs. For instance, you can use stochastic indicator as third indicator and set a rule to buy only when signal line is below 30 or you can use RSI indicator to buy when RSI is above 50.
Setting 67: Enable Signal Filtering by a Third Indicator: You can enable or disable third indicator filter here.
Setting 68: 3rd Indicator Name: You need to type the third indicator name exactly as per the indicator file name (no need to have the ex4 file extension). Further, if your indicator is NOT directly within the MT4 indicators folder (i.e. it is in a subfolder within the Indicators folder), you need to add the indicator name with the folder path. For instance, if your indicator name is “Candle Stick Reversal Indicator” and the indicator is located in the “Market” sub-folder within the main MT4 Indicators folder then you need to enter the indicator name as follows: Market/Candle Stick Reversal Indicator.
Setting 69: Color ID to Consider for Buys: This is the color/buffer ID whose value will be considered for buy signal filtering.
Setting 70: Color ID to Consider for Sells: This is the color/buffer ID whose value will be considered for sell signal filtering.
NB: If you are using an indicator that uses the same buffer/Color ID for both Buy & Sell decisions (E.g. Stochastic main line, RSI line, etc.), then Color ID would be the same for both of the above settings.
Setting 71: Candle ID to Check on 3rd Indicator: This is the candle ID to look at in the third indicator for the buffer/color ID values. It can be anything from “0” onwards. “0” means the current forming candle and “1” means the immediately completed candle and so on. Please note that the current candle can be repainting in most indicators and be careful in using “0” here.
Setting 72: Timeframe to Check for 3rd Indicator (0=Current): You can use the third indicator on any timeframe. Timeframe is selected by no of minutes. 0 means the current timeframe you are running the Automater. For instance 5 means 5 minute chart, 15 means 15 minute chart, 30 means 30 minute chart and so on. Please note the Automater will be running your indicator on the timeframe you specify from background.
NB: On MT4, you cannot do backtesting on multi timeframes (this is a technical limitation on MT4). So if you are backtesting on MT4, then you can only use 0 or the current timeframe. But you can use any timeframe when using on demo or real accounts on live market on MT4. However, MT5 supports multi timeframe backtesting.
Setting 73: Buy if Only Color ID Value More than: This is the minimum buffer value for buys. Buy signals of the main signal indicator will only be executed only if buy buffer/color ID value of the third indicator is above this level. For instance if you are using RSI as third indicator and you want to buy only when RSI is over 50, then you can use 50 here.
Setting 74: Buy if Only Color ID Value Less than: This is the maximum buffer value for buys. Buy signals of the main signal indicator will only be executed only if buy buffer/color ID value of the third indicator is below this level. For instance if you are using stochastic indicator as third indicator and you want to buy only in stochastic oversold area (i.e. stochastic indicator is less than 30), then you can use 30 here.
Setting 75: Sell if Only Color ID Value more than: This is the minimum buffer value for sells. Sell signals of the main signal indicator will only be executed only if sell buffer/color ID value of the third indicator is above this level. For instance if you are using stochastic indicator as third indicator and you want to sell only in stochastic overbought area (i.e. stochastic indicator is over 70), then you can use 70 here.
Setting 76: Sell if Only Color ID Value less than: This is the maximum buffer value for sells. Sells signals of the main signal indicator will only be executed only if sell buffer/color ID value of the third indicator is below this level. For instance if you are using RSI as third indicator and you want to sell only when RSI is below 50, then you can use 50 here.
Please note that both “more than” and “Less than” rules will be applicable for any third indicator. So, if you need only one of them, you need to add some value for the other that wouldn’t block the first. For instance, if you only need stochastic under 30 for buy, then you may just make “More than” value zero.
