NB: We recommend you try the free DEMO and see if it is suitable for your requirements before the purchase.
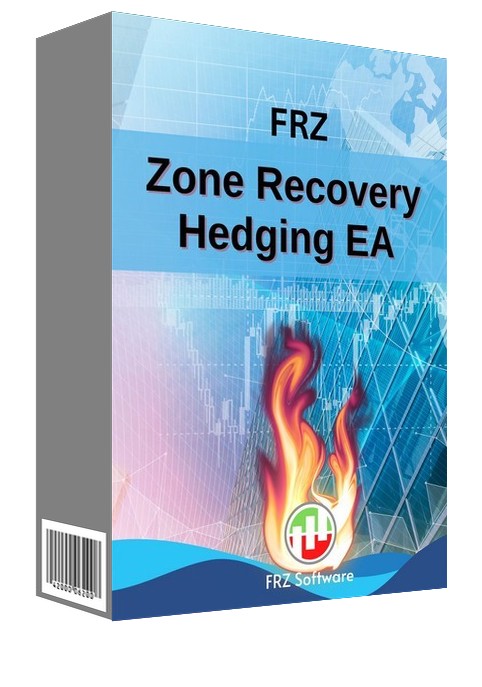
FRZ Zone Recovery Hedging MT4 is an expert adviser that you can use to design and implement automated hedging strategies. The primary objective of a forex hedging strategy is to reduce or eliminate the impact of adverse price fluctuations. Hedging strategies do not consider the market direction. They will simply open opposite trades (with a higher lot size) on the same pair in case the price starts to go against the initial trade direction.
Hedging usually involves entering an initial trade with a take profit level in any direction of the trader’s choice and then deciding on a hedging/recovery zone. If the price goes against the initial trade and reaches the other side of the recovery zone, then the trader will open another trade in the opposite direction with a higher lot size with the same take profit level. However if the price does not reach the second trade’s take profit level, the trader would open a third trade in the opposite direction to the second trade when the price reaches the other side of the recovery zone. This process will continue until one of the trades reaches the take profit level while achieving a total profit or at least a break-even level considering all open trades. When any of the trades reaches the take profit, all open trades are closed.
How it works – video
Here is an illustration of a hedging strategy:
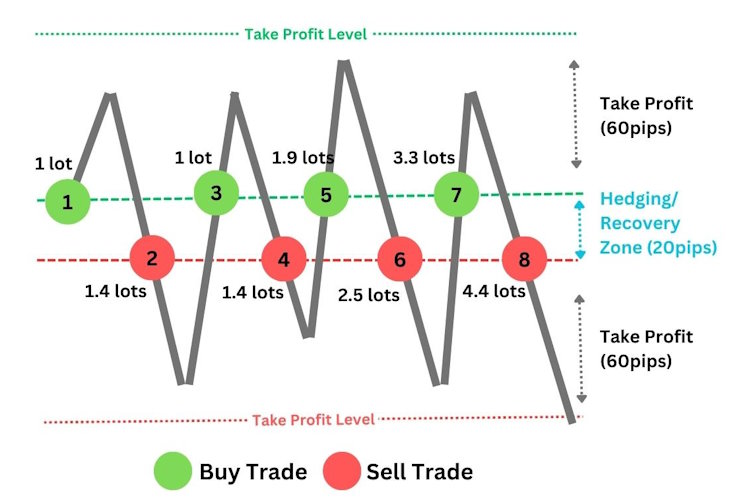
In the above strategy, the hedging/recovery zone is 20 pips while the take profit is 60 pips (1:3 RR). The trader enters the first trade with one lot and 60pip take profit. But the price turns the other side before the take profit is reached. Now when the price reaches the other side of the recovery zone, the trader enters a sell trade with 1.4 lots with 60 pips take profit.
Assuming the second trade hits the take profit and the pip value is one dollar, the trader would get a profit of $84 (1.4 x 60 pips) from the second trade while incurring a loss of $80 (1 x 80 pips) from the first trade. However, the trader would still have a $4 profit. But say that the second trade didn’t reach the take profit either and the price is going up again as given in the illustration. Now when the price reaches the other side of the recovery zone, then the trader will again enter a new buy trade with 01 lot and 60 pips take profit.
Now let’s see what would be the net profit/loss if the third trade hits the take profit.
- We have two winning buy trades each with one lot and 60 pips take profit giving us $120 (1 x 60 pips x2)
- We also have a losing sell trade with 1.4 lots and 80 pips loss giving us a loss of $112 (1.4 x 80 pips)
And you can see that the trader would still have a net profit of $8.
If the third trade does not reach take profit and the price turns to the other side, then the trader will again open a sell trade (4th trade), this time with an even higher lot size. This process will continue until one trade hits its take profit. All trades will be closed once a trade hits take profit and the lot sizing will make sure the trader will be in profit or at least breakeven when that happens.
Therefore you need to have the right lot sizing for each trade depending on the recovery zone and the take profit level. If you consider the recovery zone size and take-profit size as variable inputs, the lot sizes to achieve the breakeven level can be calculated using the following mathematical formula assuming zero spreads, swaps, commissions, and slippage.
- NBLn = (R2R+1)/R2R + [(total open sell lots) – (total open buy lots)]
- NSLn = (R2R+1)/R2R + [(total open buy lots) – (total open sell lots)]
Where NBL = Next Buy Lot Size, NSL = Next Sell Lot Size, R2R = Risk to Reward Ratio (on recovery zone and take profit)
You will notice that by increasing the R2R ratio, you can reduce the gradual increase of the lot size leading to lower risk.
If you are to consider spreads, swaps, commissions, and slippage, then you need to make an allowance for this depending on your broker. For example, you could increase the lot size by a multiplier such as 1.1 so that the formula would look like this:
- NBLn = [(R2R+1)/R2R] + (total open sell lots) – (total open buy lots)] x 1.1
- NSLn = [(R2R+1)/R2R] + (total open buy lots) – (total open sell lots)] x 1.1
However, if you want to have some profit rather than being breakeven, you will have to further increase the multiplier such as 1.2 or more depending on your requirement.
In our EA’s input settings, you can simply select the recovery zone and the take profit in pips and also set the lot multiplier making it quite easy to set up a hedging strategy in any trading pair.
Risks of Using Hedging Strategies
As you can see if the price does not trend, there is a risk of opening too many trades with higher lot sizes. This could lead to your account being blown or getting out of the account margin. Therefore heading becomes risky in consolidating/choppy markets.
Importance of Initial Entry
Therefore is important that you carefully select the market and the time of initial entry so that the number of hedging trades will be limited. In our EA you have five options to set the first entry.
- Manual Entry method – here you can use the trading buttons on the screen to enter your initial trade.
- Specified Price Entry- here you can set a specified price to enter the initial trade.
- Specified Time Entry- here you can set a specified time to enter the initial trade. For instance, you can set the London open time as the initial trade entry.
- Indicator-based Entry – If you have any indicator that provides some kind of buy and sell signals such as arrows, you can use them also to make the first entry.
- Cloud-based Entry – Here our cloud-based server will decide the initial entry time. This does not work in backtesting and also it works on forex pairs only. We recommend the M15 timeframe for this entry method.
EA Specs
| Product name | FRZ Zone Recovery Hedging EA MT4 |
| Platforms Supported | MT4/MT5 versions available |
| Time frames supported | Any |
| Supported currency pairs | EA works on any pair (tested on currency and metal pairs. If you need anything else please test with a demo first) |
| Current version | 1.3 |
If you need VPS, we can recommend this VPS provider.
A user manual on settings is available on the knowledgebase for explanations of the settings.
Please note that the past performance of any trading system is not necessarily indicative of future results. Full terms and conditions are given here



Hans –
It is a useful tool. Make sure you use you start with a low lot size allowing it to do the martingale. Otherwise you would blow your account in no time
Victor –
What is the suggested minimum account size for this trading software?
FRZ –
$1000 with starting 0.01 lot would be ok.
Jacob Marine –
I am using it on MT5 and it is doing well enough. ALWAYS start with the smallest lot size!